
Due to many requests, I’ll share some tips for photographing lightning. Please note there is no ‘one way’ to do it; this is just a jumping point from which you may want to start. This particular photo I took reached the front page of Flickr’s Explore.
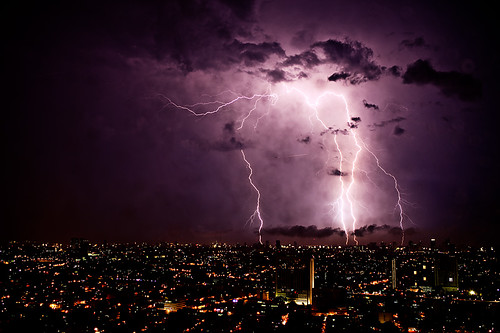
So what camera and settings did I use?
Canon 5D Mark II| Canon EF 35mm f/1.4L
| at f/4 for 7 seconds | ISO 100
- Stay safe: Ok, this is obvious but still, if you can take the pics from indoors as I did, that’s more ideal than standing outdoors with a huge metal tripod screaming, “C’mon you can do better than that!”.
- Use a tripod (or a stable surface): This is critical because you’ll be keeping the shutter open longer than usual.
- Consider the foreground but include more of the sky: If this is a night shot, you’ll want to strive for longer shutter speeds in order to expose a bit of the foreground.
- If possible, use a cable release or similar: I use this:Â Canon Remote Switch
that enables you to open the shutter without touching the camera. It eliminates camera shake that occurs when you press the shutter. It also allows you to use the “Bulb” setting if your camera has that feature.
- Use manual focus: If you’re shooting in darkness, you don’t want your camera hunting for focus points. You can likely set it to manual and infinity since the lightning will be far off in the distance.
- I personally use Manual Mode: I prefer to have full control over the exposure when taking photos like this. You could also try Shutter Priority (Tv).
- Try different shutter speeds: 30 seconds is about as long as I went. Any longer and I started picking up too much light in the foreground. If you’re using the remote switch, you can use “Bulb” and keep it open as long or short as you like.
- Use a smaller aperture: If you can set your aperture to something like f/8, you’ll have a higher chance of getting everything in focus.
- Keep trying: I sat at my window taking no less than 30 long exposure photos. This was the ONLY one that came out well. All of the rest were cloud to cloud lightning or I missed the timing, or just as I thought the storm was done I packed up and left the room only to be pounded by the thunder from yet another bolt I missed.
- Combine images if you wish: I didn’t do this – this is one exposure only. However, many lightning photos you’ll see online will be multiple exposures combined afterwards.
Please share your shots with the rest of us. We’d love to see the results of your photos! If you enjoy these type of tips and how-to’s, I’ll post more.